When people think about how to get a snatched waist, the first idea that comes to mind is usually a hardcore abs workout.
That’s not the full picture. A defined waist comes from a mix of factors: strengthening the right muscles, lowering body fat when it’s needed, training your posture, and building a program around movements that create the illusion of a more defined, hourglass shape.
You don’t need dozens of complicated moves to see the difference. This guide covers seven exercises that actually help you get a snatched waist, plus a handful of tips that make your training sessions count.
How these exercises help
A snatched waist is less about the waist itself and more about everything around it. Your midsection can only look as tight as the muscles supporting it, so the exercises in this guide target five things at once instead of hammering your abs in isolation. That’s also why two women with a similar body fat percentage can look completely different around the middle. The one with stronger glutes, tighter posture, and a bit more shoulder width will almost always look more snatched, even at the same weight on the scale.
- Lower body fat, since even strong abs stay hidden under a layer of extra fat
- A strong, stable core that pulls your midsection in rather than letting it push out
- Well-developed glutes, which widen the hips and create contrast against the waist
- Balanced shoulder development, which widens the upper body slightly and narrows the waist by comparison
- Good posture, since a rounded back and forward shoulders can make even a lean waist look thicker
Train all five and the waist starts to look snatched even before the scale moves. Skip straight to crunches, and you’re only working on one piece of a five-piece puzzle.
There’s a measurable version of this too. Fitness coaches often talk about waist-to-hip ratio, which compares the circumference of your waist to the circumference of your hips. A smaller number usually reads as a more snatched shape, and you can move that number two ways: shrink the waist, or build the hips and glutes. Most women get faster, more visible results building both at once instead of chasing the waist alone.
How to get a snatched waist: 7 Best Exercises
These 7 exercises can actually help snatch your waist like crazy, so you must do them in the order listed, resting only as noted to keep your heart rate up between sets.
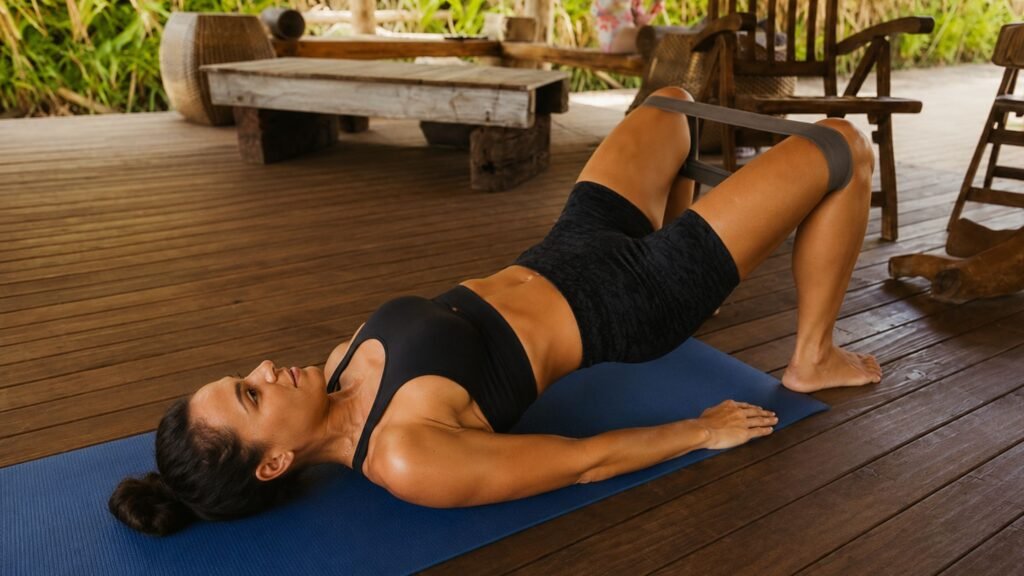
1. Glute bridge or hip thrust
This is the perfect move to build your glutes. This exercise widens the base of the hourglass shape and makes the waist look narrower by contrast. It also teaches your hips to extend without your lower back taking over, which protects your spine during heavier lifts later on. Most women feel this almost entirely in their glutes within the first two or three sessions once they stop letting their lower back do the work.
Muscles worked: Glutes, hamstrings, and lower back
Sets: 3
Reps: 12 to 15
Rest: 45 seconds
Step-by-step method:
- Lie on your back with knees bent and feet flat, hip-width apart. For a hip thrust, rest your upper back against a bench instead.
- Squeeze your glutes and press through your heels to lift your hips toward the ceiling.
- Pause at the top for a full second, keeping your ribs tucked so your lower back doesn’t arch.
- Lower with control until your hips are just above the floor, then repeat.
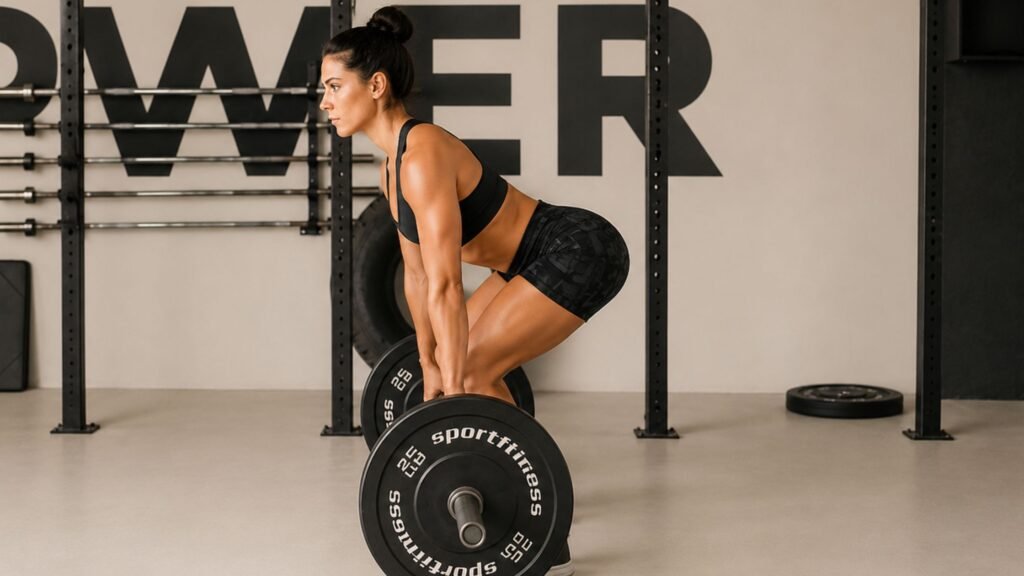
2. Romanian deadlift
One thing I love about the Romanian deadlift is that it trains the entire posterior chain, from the hamstrings up to the glutes and then the lower back. Having strong hamstrings and glutes supports an upright posture, and posture alone can change how narrow or wide a waist looks. The goal is to start light here, even with just an empty barbell or a pair of light dumbbells, since the hinge pattern takes a session or two to feel natural.
Muscles worked: Hamstrings, glutes, and lower back
Sets: 3
Reps: 10 to 12
Rest: 60 seconds
Step-by-step method:
- Hold a barbell or a pair of dumbbells in front of your thighs, feet hip-width apart.
- Keep a slight bend in your knees and hinge at the hips, pushing your hips back.
- Lower the weight along your legs until you feel a stretch in your hamstrings, usually around shin height.
- Drive your hips forward to stand back up, squeezing your glutes at the top.
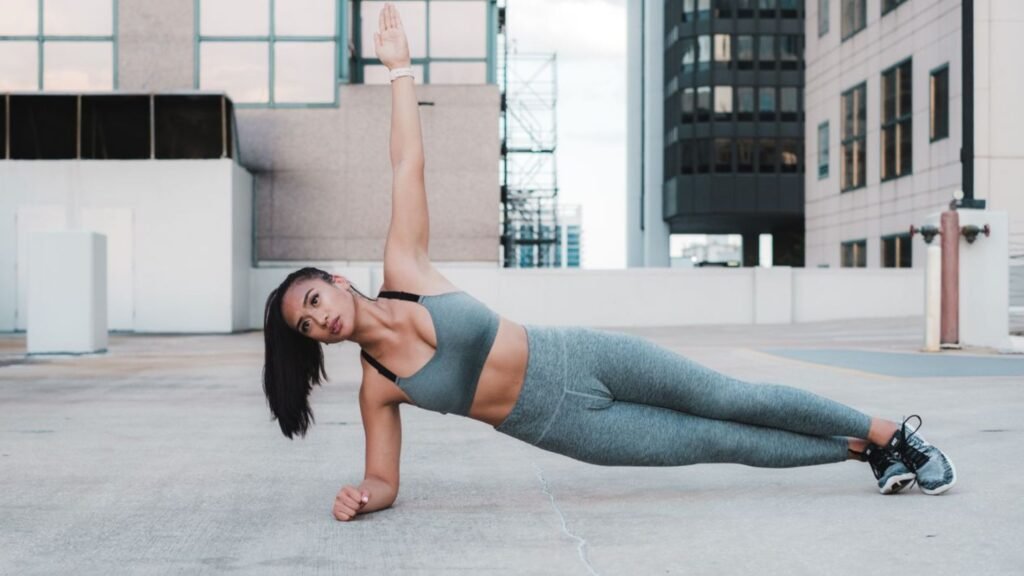
3. Side plank
Most core routines focus on the front of the abs and skip the obliques, which are the muscles that actually taper the waistline. The side plank isolates them directly and builds the kind of lateral core strength that keeps your midsection tight during everyday movement. If 20 seconds feels too easy, drop to your bottom knee first rather than jumping straight to a longer hold with poor form.
Muscles worked: Obliques, deep core, and shoulders
Sets: 3 per side
Reps: Hold for 20 to 30 seconds
Rest: 30 seconds
Step-by-step method:
- Lie on your side with your elbow stacked under your shoulder and legs extended.
- Lift your hips off the floor so your body forms a straight line from head to feet.
- Brace your obliques and hold the position without letting your hips sag.
- Lower with control, then switch sides once you finish the set.
MUST READ==> Why your lower belly pooch won’t go away and what actually helps
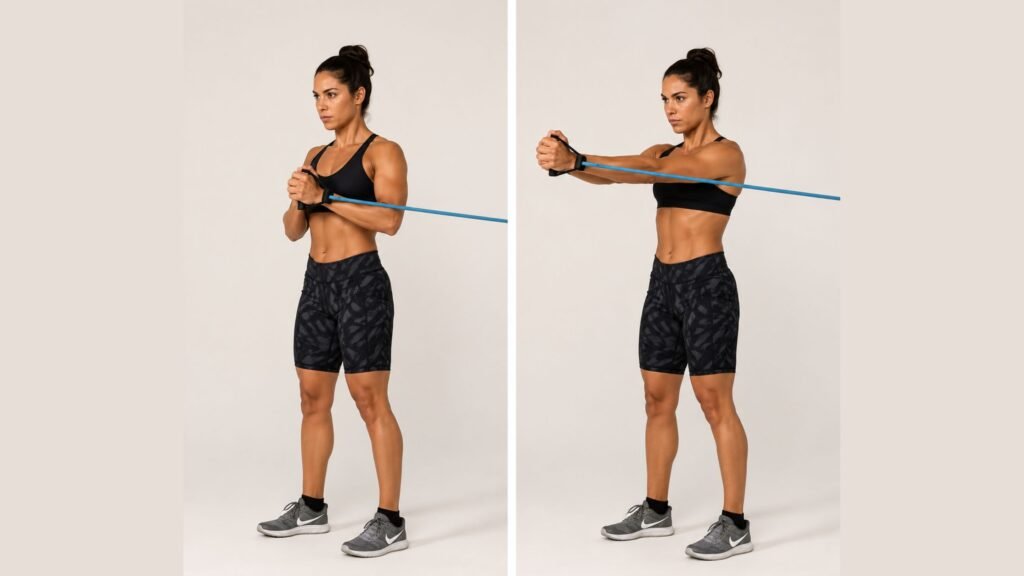
4. Pallof press
The Pallof press trains your core to resist rotation instead of creating it. That anti-rotation strength is what keeps your torso stable when you carry groceries on one side or twist to grab something, and a stable torso reads as a tighter waist. No band or cable machine on hand? Loop a towel around a sturdy door and pull against that instead.
Muscles worked: Obliques, transverse abdominis, and shoulders
Sets: 3 per side
Reps: 10 to 12
Rest: 30 seconds
Step-by-step method:
- Attach a resistance band to an anchor point at chest height and stand sideways to it.
- Hold the band with both hands at your chest, stepping away until there’s tension.
- Press the band straight out in front of you without letting your torso rotate toward the anchor.
- Bring your hands back to your chest slowly, then repeat before switching sides.
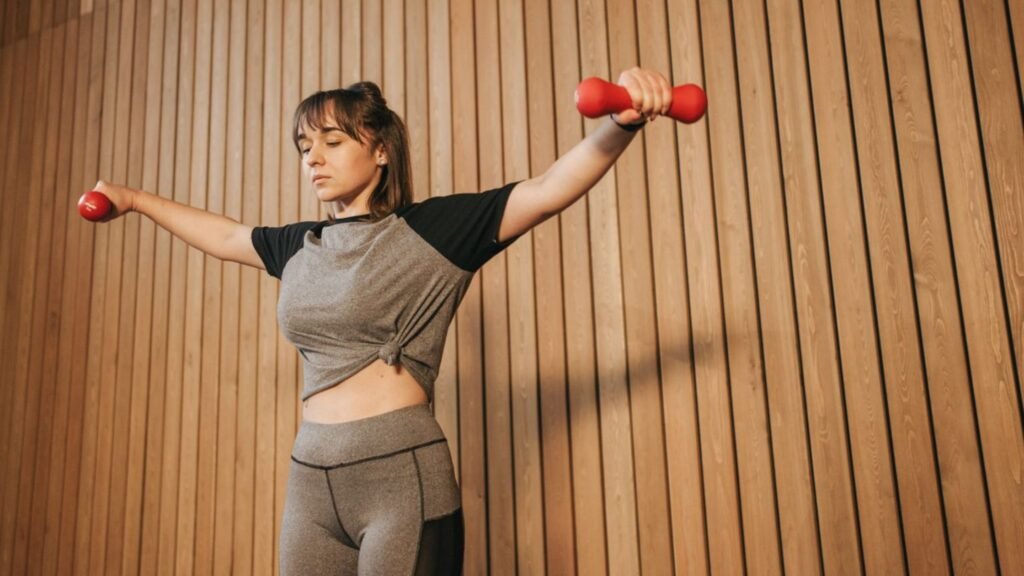
5. Lateral raise
A snatched waist depends on contrast as much as it depends on the waist itself. Building the middle deltoid widens the shoulders slightly, which creates a visual V-taper that makes the waist below it look smaller without changing the waist at all. Two to three-pound dumbbells are plenty to start, since this small muscle fatigues fast and heavy weight usually just turns into a shrug.
Muscles worked: Shoulders (middle deltoid) and upper traps
Sets: 3
Reps: 12 to 15
Rest: 45 seconds
Step-by-step method:
- Stand tall holding a light dumbbell in each hand at your sides, palms facing in.
- With a soft bend in your elbows, raise both arms out to the sides until they reach shoulder height.
- Pause briefly at the top, leading with your elbows rather than your hands.
- Lower slowly back to your sides and repeat without swinging the weights.
ALSO READ==.> How to Get Rid of a Muffin Top: What to Do, Eat, and Limit
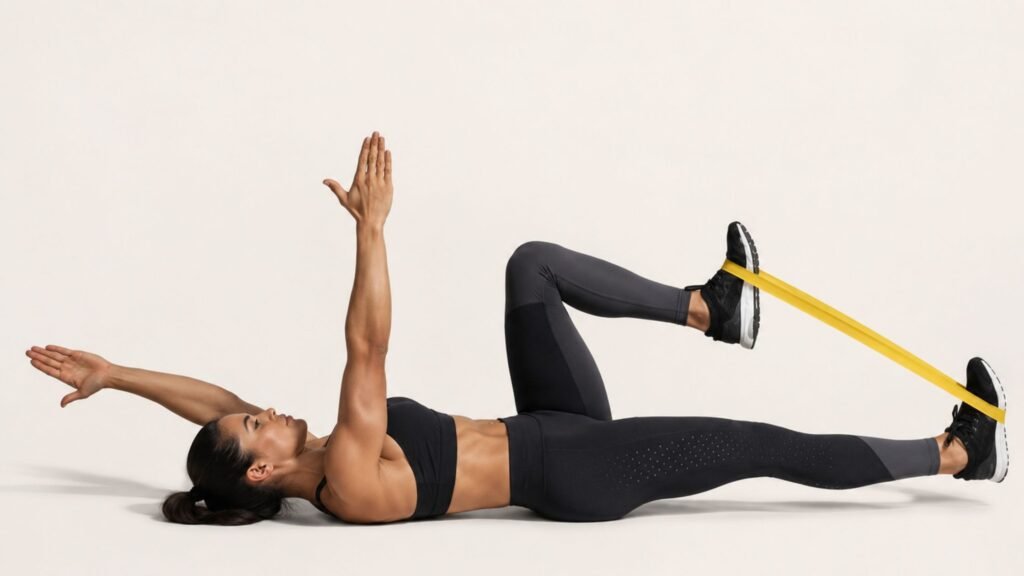
6. Dead bug
The dead bug trains your deep core to hold your spine still while your arms and legs move, which is closer to how your abs actually get used in daily life than a sit-up is. It builds the kind of quiet core strength that flattens the stomach over time. If your lower back lifts off the floor at any point, that’s the signal to shorten the range of motion until your control catches up.
Muscles worked: Deep core (transverse abdominis) and hip flexors
Sets: 3
Reps: 10 per side
Rest: 30 seconds
Step-by-step method:
- Lie on your back with arms reaching toward the ceiling and knees bent at 90 degrees.
- Press your lower back flat into the floor and brace your core.
- Slowly lower your right arm and left leg toward the floor at the same time, stopping just before they touch.
- Return to the starting position and repeat on the opposite side.
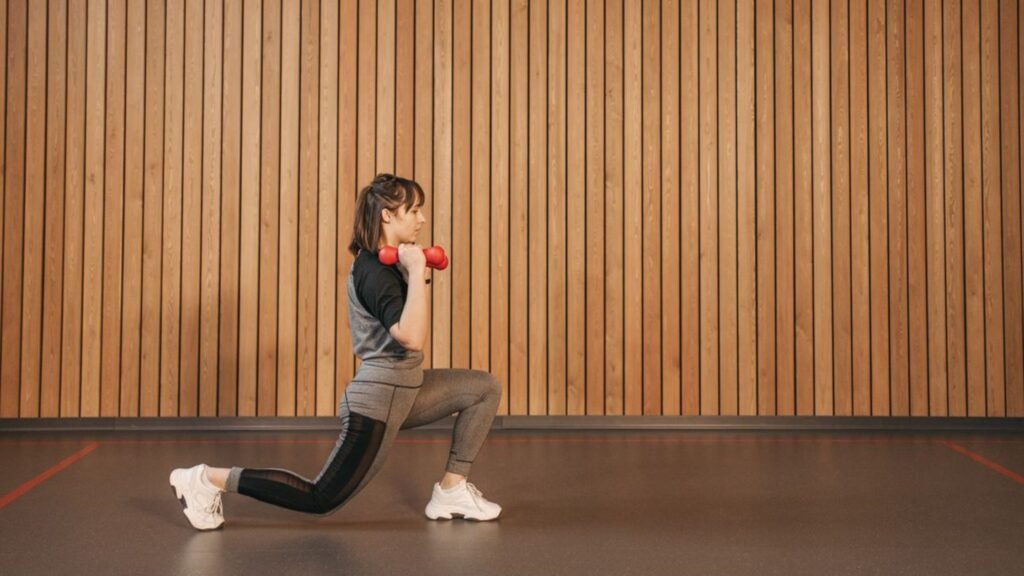
7. Walking lunges (or Bulgarian split squat)
Lunges and split squats build the glutes and legs unilaterally, meaning one side works at a time, which does more for hip shape than a standard squat does for most people. Bigger, stronger glutes and quads round out the lower half of the hourglass silhouette. The split squat also exposes strength imbalances between your left and right leg that a regular squat tends to hide.
Muscles worked: Glutes, quads, and hamstrings.
Sets: 3
Reps: 10 to 12 per leg
Rest: 60 seconds
Step-by-step method:
- Stand tall holding dumbbells at your sides, or set up in front of a bench for the split squat version.
- Step forward into a lunge, lowering until both knees reach roughly 90 degrees.
- Push through your front heel to rise, stepping the back leg forward to continue walking (or return to the start for split squats).
- Keep your torso upright throughout, and alternate legs with each rep.
How often to do these exercises
While working on how to get a snatched waist, you must choose Frequency over intensity. This is because two focused sessions a week for eight weeks will get you further than one brutal workout followed by six days of rest. In the table below, I have laid out how many sets and reps to do along with how to add progressive overload once the current sets and reps feel easy.
Progressive overload in this case simply means gradually asking your muscles to do a little more than they’re used to, whether that’s an extra rep, a slightly heavier dumbbell, or a longer hold. Without it, your body adapts to the same stimulus, which stalls progress.
| Exercise | Weekly frequency | Sets and reps | Progressive overload |
| Glute bridge or hip thrust | 2 to 3x | 3 sets of 12 to 15 | Add 5 to 10 lbs once you hit 15 reps with good form |
| Romanian deadlift | 1 to 2x | 3 sets of 10 to 12 | Add weight in small increments, roughly 5 lbs per side |
| Side plank | 2 to 3x | 3 holds of 20 to 30 seconds per side | Add 5 seconds to the hold each week |
| Pallof press | 2x | 3 sets of 10 to 12 per side | Move to a thicker resistance band once reps feel easy |
| Lateral raise | 2x | 3 sets of 12 to 15 | Add 1 to 2 lbs per dumbbell once form stays clean |
| Dead bug | 2 to 3x | 3 sets of 10 per side | Slow the tempo down before adding reps |
| Walking lunges or split squat | 1 to 2x | 3 sets of 10 to 12 per leg | Add dumbbells, then increase their weight every 2 to 3 weeks |
The biggest mistakes that prevent a snatched waist
There are some common mistakes that will prevent or delay your snatched waist even when you are sticking to the right workout plan, diet, and lifestyle. Some of these mistakes include;
Only training abs
Training abs every single day doesn’t shrink your waist any faster, and it can actually leave the muscles too fatigued to grow. Your core needs recovery time between sessions just like any other muscle group, and skipping that recovery slows progress instead of speeding it up. Two or three focused core sessions a week, paired with the glute and shoulder work above, will do more than daily crunches ever could.
Ignoring nutrition
You can follow every step in this guide to the letter and still not get a snatched waist at the end, and this is because muscle definition only shows once the layer of fat covering it gets thin enough, and that happens in the kitchen, not the gym. A lot of women underestimate how much they’re eating simply because they’re not tracking it, and they feel exercising will make up for bad dieting.
Skipping strength training
When you focus only on Cardio, you tend to lose muscle alongside body fat. To make it simple, all your glutes and shoulder muscles that are supposed to give you a defined hourglass shape will all be gone after you are done losing weight through cardio. The only way to preserve these muscles is by strength training. Strength training two or three times a week does more for waist shape long term than an extra 30 minutes on a treadmill. Cardio still has a place for heart health and burning extra calories, but it should sit alongside strength work, not replace it.
Expecting spot reduction
If you have a high body fat percentage and you are hoping that somehow you can snatch your waist by constantly exercising it, then you got it all wrong. Your body decides where it loses fat first based on genetics, not on which muscle you trained that day.
These exercises build the muscle underneath your waist, true. But they don’t control whether fat comes off your stomach before it comes off anywhere else. If you have a high body fat percentage, the best way to combat this is through consistent training, and a modest calorie deficit still gets you there. It just takes patience with an order you can’t control, rather than more crunches aimed at speeding it up.
Tips to get better results faster
These 7 EXERCISES WILL SNATCH YOUR WAIST LIKE CRAZY, only if you pair them with what I’m about to tell you now. These tips will play a vital role in determining how fast you can get a snatched waist. Think of them as the settings that determine how much of your gym effort actually shows up in the mirror.
- Eat enough protein: You should aim for roughly 0.7 to 1 gram per pound of body weight so your muscles can actually recover and grow between sessions, and spread it across three or four meals rather than one big serving at dinner.
- Maintain a calorie deficit if fat loss is the goal: if you have a high body fat percentage, you should be in a calorie deficit. Do not try to be very restrictive. A moderate deficit of 300 to 500 calories a day tends to preserve muscle better than an aggressive one, and it’s easier to sustain for more than a few weeks
- Prioritize sleep: seven to nine hours supports the hormones that regulate both fat loss and muscle repair, and even a few nights of poor sleep can blunt your progress in the gym
- Stay consistent: two to three solid sessions a week for two months will outperform a perfect week followed by three weeks off, since muscle and posture changes build gradually rather than all at once
- Track your measurements, not just the scale: a tape measure around your natural waist and hips tells you more about your progress here than body weight alone
MUST READ==> 10 Full-Body Pilates Workouts To Achieve Anime Body
Final thoughts
That is everything you need to know about how to get a snatched waist. It’s not as complicated as fitness trainers make it sound; keep it simple, train your glutes, shoulders, and core together while prioritizing your diet and sleep, and you are already halfway there.
Pick at least 3 to 4 exercises and start with that, and if doing all seven feels like too much, then stick to the ones that feel easier and build with that. Remember that progress takes time, so don’t be in a rush to tell yourself that it’s not working; give yourself at least eight weeks before you can judge your results.